Around Waynos house
- DRIVEN
- Posts: 7699
- Joined: Thu Jun 27, 2013 7:05 pm
- Location: I've been everywhere
- Has thanked: 1210 times
- Been thanked: 1180 times
Re: Around Waynos house
Is this N or Z scale? Either way, pretty cool.
When the only tool you have is a hammer every problem starts to look like a hippy.
- wayno
- Posts: 5320
- Joined: Thu Jun 27, 2013 8:44 pm
- Location: Vancouver WA
- Has thanked: 432 times
- Been thanked: 1302 times
Re: Around Waynos house
This is Z scale.
“The difference between genius and stupidly is that genius has its limits” Albert Einstein
- wayno
- Posts: 5320
- Joined: Thu Jun 27, 2013 8:44 pm
- Location: Vancouver WA
- Has thanked: 432 times
- Been thanked: 1302 times
Re: Around Waynos house
OK, I did more work on the Z scale coffee table trains, so far I leveled the new area outside the existing track with the upper level of that existing track, here it is before I did the ends, you can see it is level on the front and back as I already did them in these photos.
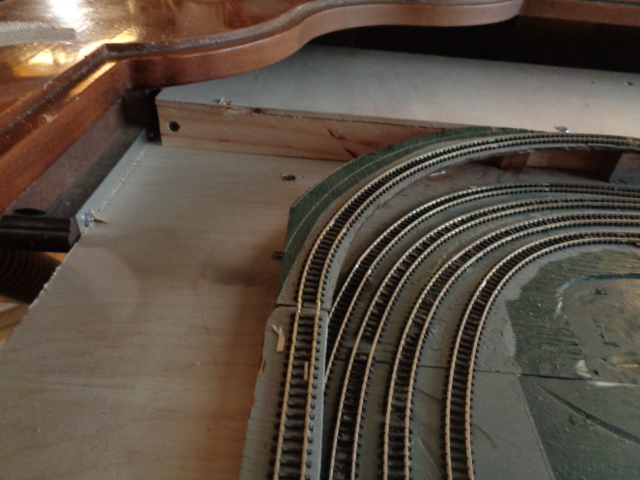
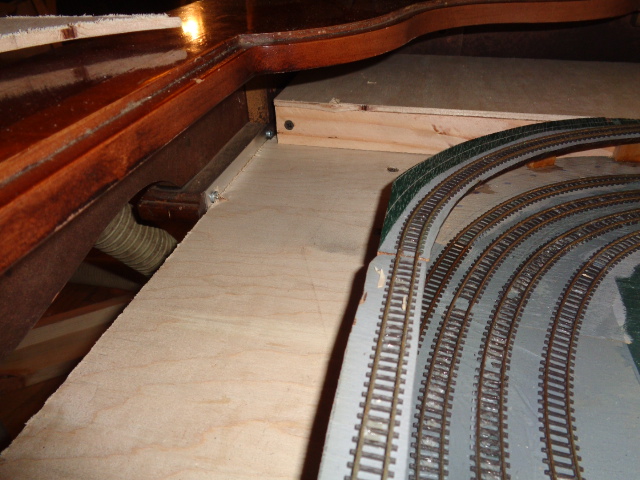
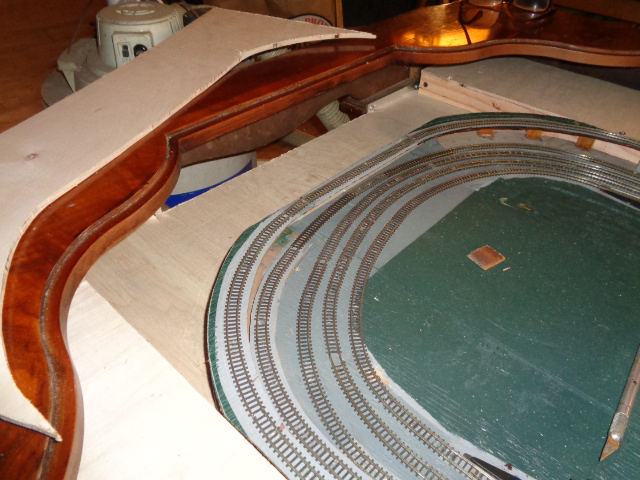
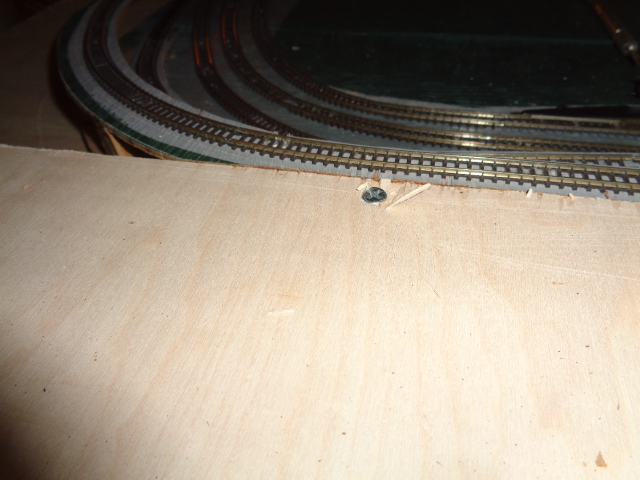
Here it is after I did the sides, it is not perfect yet but I will get there eventually.
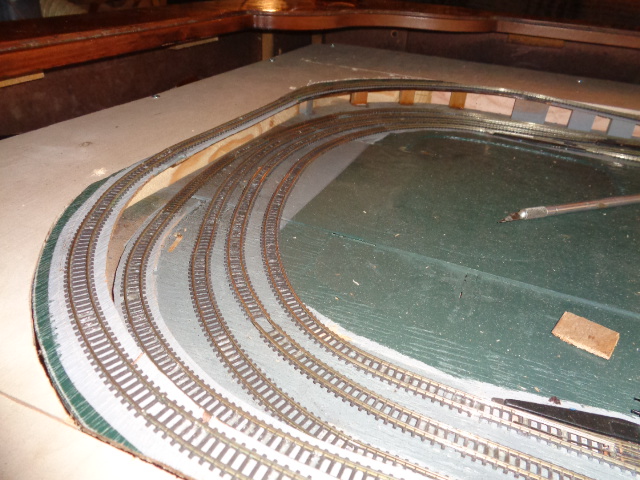
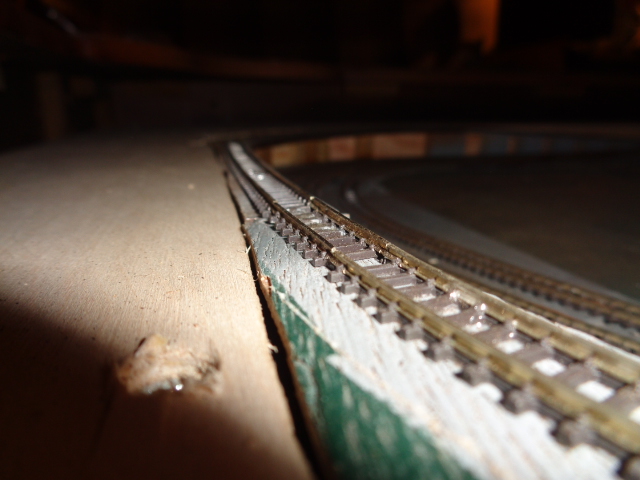
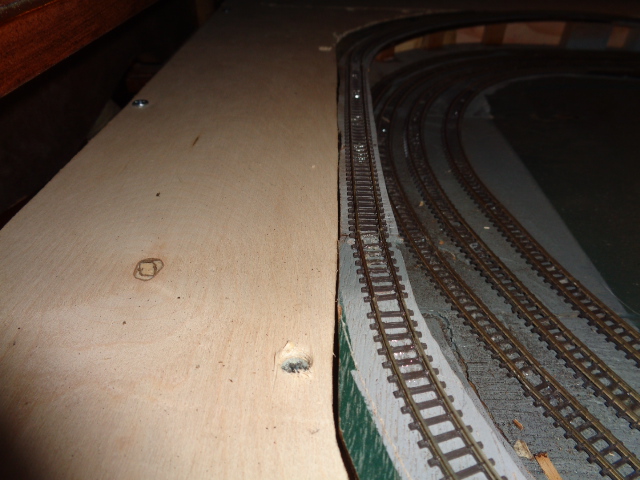
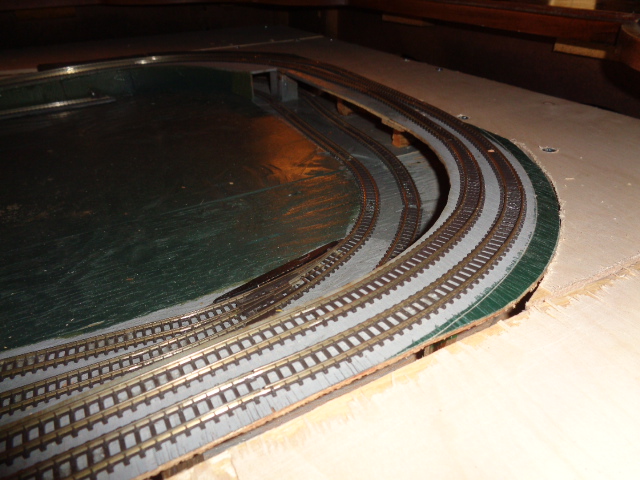
I have had a lot of issues with this small locomotive recently(bought it because of the very sharp turns that the long locomotive could not make), at first it was difficult to get it moving on the track, I finally got it running on a 9 volt test track(oval) with a real 9 volt battery, and then it just quit, all my other trains would work but not that one, I thought maybe the gears were dirty so I kept cleaning them, I could get the thing to run reliably on the track, it would just quit and would not move even with me pushing it, I spent hours getting it to run upside down testing it, I spent hours and hours, so last night I was on about another 3 hours, the motor would run but not very fast, and most the time when I put the wheels on it, it would not run anymore, I was about to give up and call it a total loss, I was trying to figure out how to get it farther apart so I could see the motor, it took a while but I figured it out, I basically got the cab off the chassis, I was messing with it since it was a lot easier to test this way when I realized that one of the copper things was not as long as the other, I looked real close and I all of a sudden realized that the brush had fallen out of position on the armature shaft, the copper arm holding the brush was riding on that shaft, I took it out and put it back together like I thought it should be, then tested it and it ran like crazy, over triple the speed it was running before, I put it completely back together, set it on the track(the green area) and it ran so fast it would fall off the track in a corner, but it still did not hold an even speed, I think I need to clean the wheels and track some more, hopefully I will not need to take it apart anymore.
More to come on this project.


Here it is after I did the sides, it is not perfect yet but I will get there eventually.


I have had a lot of issues with this small locomotive recently(bought it because of the very sharp turns that the long locomotive could not make), at first it was difficult to get it moving on the track, I finally got it running on a 9 volt test track(oval) with a real 9 volt battery, and then it just quit, all my other trains would work but not that one, I thought maybe the gears were dirty so I kept cleaning them, I could get the thing to run reliably on the track, it would just quit and would not move even with me pushing it, I spent hours getting it to run upside down testing it, I spent hours and hours, so last night I was on about another 3 hours, the motor would run but not very fast, and most the time when I put the wheels on it, it would not run anymore, I was about to give up and call it a total loss, I was trying to figure out how to get it farther apart so I could see the motor, it took a while but I figured it out, I basically got the cab off the chassis, I was messing with it since it was a lot easier to test this way when I realized that one of the copper things was not as long as the other, I looked real close and I all of a sudden realized that the brush had fallen out of position on the armature shaft, the copper arm holding the brush was riding on that shaft, I took it out and put it back together like I thought it should be, then tested it and it ran like crazy, over triple the speed it was running before, I put it completely back together, set it on the track(the green area) and it ran so fast it would fall off the track in a corner, but it still did not hold an even speed, I think I need to clean the wheels and track some more, hopefully I will not need to take it apart anymore.
More to come on this project.
“The difference between genius and stupidly is that genius has its limits” Albert Einstein
- wayno
- Posts: 5320
- Joined: Thu Jun 27, 2013 8:44 pm
- Location: Vancouver WA
- Has thanked: 432 times
- Been thanked: 1302 times
Re: Around Waynos house
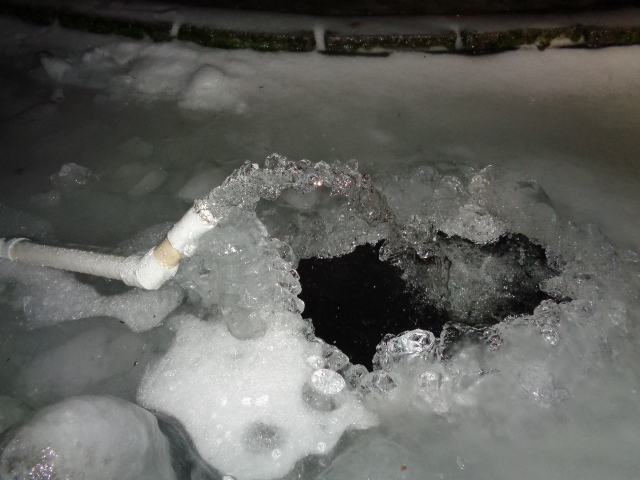
Its been cold here, one day the high was 19 degrees and the low was 14 degrees, my pond filters, tubes, and exits into the pond were freezing up faster than I could keep them clear, the filters started over flowing so I turned the pump off, now I cannot let the pump not run as the entire pond would freeze killing the 4 KOI(fish) I have left, so I disconnected the pump output and connected a pipe to it. pointed it up in the air at a 45 degree angle, and turned the pump on again and busted a hole in the ice where the water was hitting the ice so it would land in the water instead and continue to keep it open, water moving does not freeze.
I also keep the hummingbird feeder thawed by pointing a heat lamp at it, my neighbor was asking me if I had more heat lamps for his feeder and I did not, a little while later I walked out and turned the corner and there were at least 8 to 10 hummingbirds in one blueberry bush alone, and a lot more perched other places, I have never seen so many hummingbirds in one place not fighting each other.
I have been working on my coffee table train but it has been so cold it is hard to go outside to use the table saw, I am making progress, I will take more photos when it appears I have done something, right now it is about laying track and painting what the track rests on so it looks like a gravel hill like real trains.
“The difference between genius and stupidly is that genius has its limits” Albert Einstein
- wayno
- Posts: 5320
- Joined: Thu Jun 27, 2013 8:44 pm
- Location: Vancouver WA
- Has thanked: 432 times
- Been thanked: 1302 times
Re: Around Waynos house
This was my fix to keep the water moving when it was 14 degrees outside.
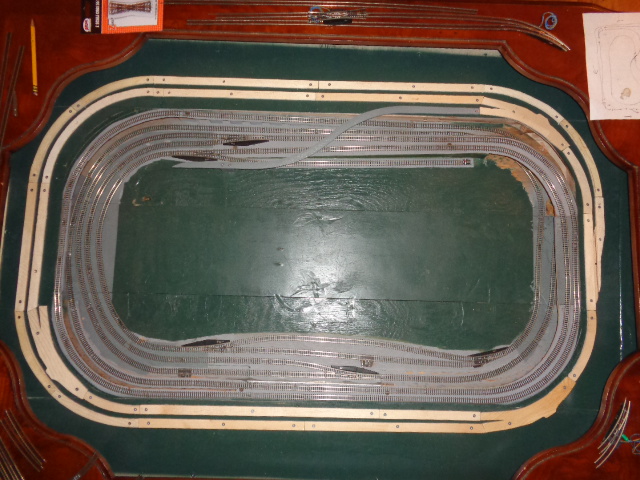
This is my coffee table train, all the wood-colored wood is where new track will be added.
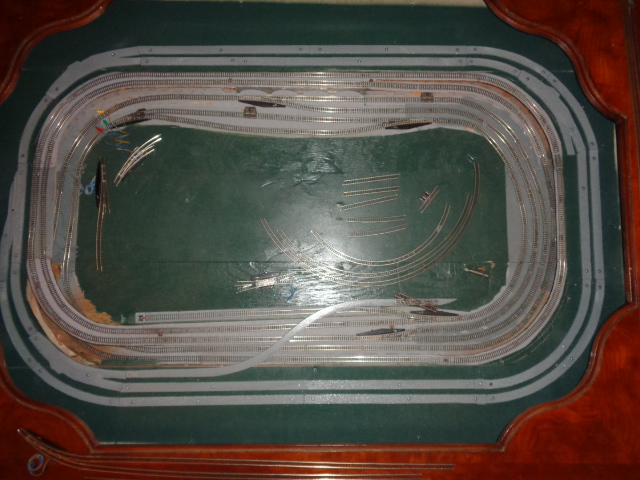
Painted gray like gravel would look.
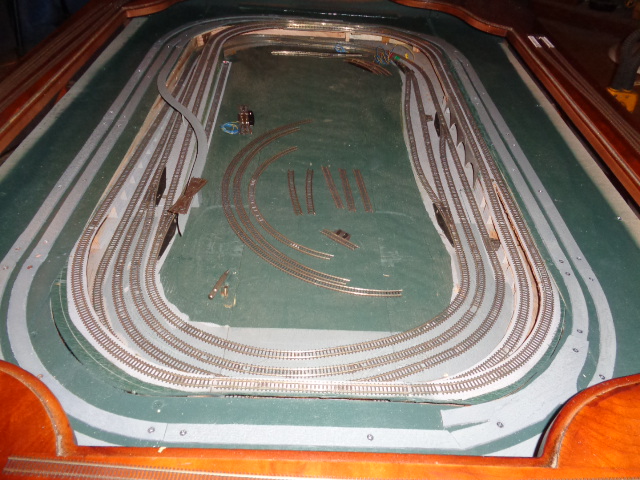
You can see the track section that will be bridging over into the center area, this is very complicated, most small train guys would not do what I have planned, most the track has been laid out now, but I ran out of track, I am 3 pieces short of finishing the outside gray areas, the center area I need more flex track, I will have to wait for more to come in at the hobby shop to finish that.
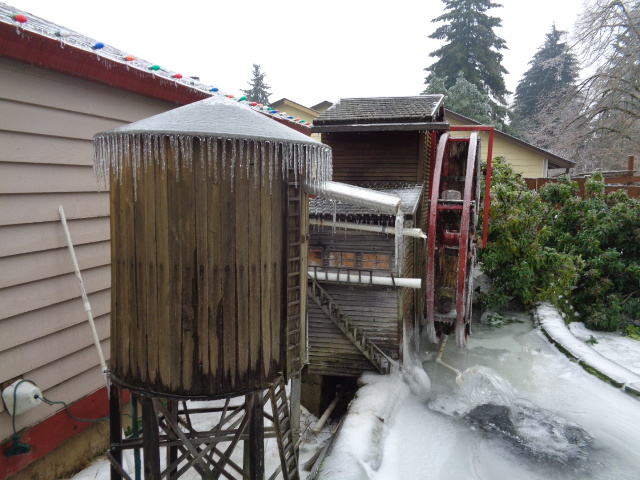
Here is the new roof I made for the water tower in sawmill pond theme, the icicles look cool, my shingled wood roof did not do this that nice.
I wish this snow would melt here, it is above freezing but my roof/driveway/yard snow is not melting very fast, the library is open again so I am here writing this post.

This is my coffee table train, all the wood-colored wood is where new track will be added.

Painted gray like gravel would look.

You can see the track section that will be bridging over into the center area, this is very complicated, most small train guys would not do what I have planned, most the track has been laid out now, but I ran out of track, I am 3 pieces short of finishing the outside gray areas, the center area I need more flex track, I will have to wait for more to come in at the hobby shop to finish that.

Here is the new roof I made for the water tower in sawmill pond theme, the icicles look cool, my shingled wood roof did not do this that nice.

I wish this snow would melt here, it is above freezing but my roof/driveway/yard snow is not melting very fast, the library is open again so I am here writing this post.
“The difference between genius and stupidly is that genius has its limits” Albert Einstein
- DRIVEN
- Posts: 7699
- Joined: Thu Jun 27, 2013 7:05 pm
- Location: I've been everywhere
- Has thanked: 1210 times
- Been thanked: 1180 times
Re: Around Waynos house
We're going back and forth on either side of freezing here too. Slowly melting off but mostly just getting slippery.
The track is really coming together. Are you planning any diorama details or just tracks and trains?
The track is really coming together. Are you planning any diorama details or just tracks and trains?
When the only tool you have is a hammer every problem starts to look like a hippy.
- wayno
- Posts: 5320
- Joined: Thu Jun 27, 2013 8:44 pm
- Location: Vancouver WA
- Has thanked: 432 times
- Been thanked: 1302 times
Re: Around Waynos house
I have been thinking about that, today I was looking to see if anyone made Z scale trees for the edges mostly, I pulled out my Monopoly game and looked at the houses/hotels for size, it appears to me the hotels are houses, and the little green houses are tiny homes, I am not sure I want to take apart the monopoly game though, it's an early one with all the pieces and it is in very good shape(looks almost new except for the dirty box), and I would have to paint the hotels/houses, I do not want my town looking like a Clint Eastwood movie.
I got a lot of what I need to finish the outside parts and get it running, the inside would be too expensive to buy ingle pieces of track to finish, I opened a paypal account and sold an eyepiece for over $200.00, it was a new account so the funds are held for 21 days, once they come available I can buy the flex track to finish the center, I opened the paypal account to sell things so I can buy things I need, but if I sell more than $600.00 worth of stuff I have to give them my SS number, I would never put that on my computer so I cannot sell more than $600.00 worth of stuff a year, not sure if paypal will work for me, I will not put my SS number or my bank account number on this laptop, and I tried to give them my SS number over the phone and they would not do it, I suspect things are going to get real ugly this year in this country and my info is not going to be out there.
I got a lot of what I need to finish the outside parts and get it running, the inside would be too expensive to buy ingle pieces of track to finish, I opened a paypal account and sold an eyepiece for over $200.00, it was a new account so the funds are held for 21 days, once they come available I can buy the flex track to finish the center, I opened the paypal account to sell things so I can buy things I need, but if I sell more than $600.00 worth of stuff I have to give them my SS number, I would never put that on my computer so I cannot sell more than $600.00 worth of stuff a year, not sure if paypal will work for me, I will not put my SS number or my bank account number on this laptop, and I tried to give them my SS number over the phone and they would not do it, I suspect things are going to get real ugly this year in this country and my info is not going to be out there.
“The difference between genius and stupidly is that genius has its limits” Albert Einstein
- DRIVEN
- Posts: 7699
- Joined: Thu Jun 27, 2013 7:05 pm
- Location: I've been everywhere
- Has thanked: 1210 times
- Been thanked: 1180 times
Re: Around Waynos house
Agreed. I think we're in for some wild times.
When the only tool you have is a hammer every problem starts to look like a hippy.
- wayno
- Posts: 5320
- Joined: Thu Jun 27, 2013 8:44 pm
- Location: Vancouver WA
- Has thanked: 432 times
- Been thanked: 1302 times
Re: Around Waynos house
I have spent hours playing with this coffee table train, what I do is get each train on its own circuit running smoothly without anything derailing, if it keeps derailing in a known spot I move all my attention to it and then either adjust something, or pull the track up and either put new track down, or work on the track while I have in in my hands and then reinstall it, or a few times I have had to sand or rebuild the area that the track is mounted on so it is a smoother transition on the change of level, not everything I built in 2005 was nice and smooth/flat, and getting the new stuff to blend in with the old is a challenge itself, I cut a hole in the middle to put the older area in and the whole thing sagged in the middle, well last night 2 of the three circuits ran for an hour plus without any issues.
Another thing I will mention is not all the train cars/boxes, whatever you want to call them work well in certain positions, my caboose kept derailing, I fought this for a while, then a couple days ago I put it in position backwards from what I thought it should be and it does not derail anymore, if the section that sticks up goes forward I have no issue, but if it is towards the back it disconnects/derails all the time, another thing is two smaller locomotives(steam type) I have that look exactly the same, I like that because I run them together, how often do you see only one locomotive pulling a train, the older one I bought in 2005 gets jumpy, the new one I bought used because these small locomotives will go around sharp turns, well my old one I pulled apart because it quit running, I fixed it(a brush moved out of position), I lost this tiny little spring(so small I cannot see it without reading glasses) that made the lever/coupler that holds the train cars together stay in the middle, well by the time I found that tiny spring I had stepped on it and ruined it looking for it, so I removed the front coupler, I had to put it back in without a spring because it turns out my old locomotive needs to be behind the newer locomotive which needs to be backwards because one of them tiny springs is missing in it also, with the new locomotive backwards in front nothing derails and they both run very smooth, I am afraid to remove the tiny spring and put it in the back coupler so I can run that locomotive forwards because that is how I lost the other spring, just exhaling blows the spring off the table I am working on and more than once trying to put the spring/coupler back into position the compressed spring gets loose and it is gone, it sometimes takes 10 plus minutes to find it if I know which way it went, it took an hour for me to find the ruined one, I swept the floor and found it in the dirt using a magnet, now if the spring is loose it is held on a magnet on the end of a small screwdriver so I can breathe without blowing it away.
I only have two power packs(transformers) for three circuits, so I can only run two circuits at once, I have paid for a new power pack/transformer already, but it has not shipped yet and the store does not know when it will ship, both the trains/circuits I am using now work great, I need another diesel type locomotive for the third circuit as the other steam type locomotive I have is way too long and derails around the sharp turns, I will take photos of all the locomotives/trains I have.
“The difference between genius and stupidly is that genius has its limits” Albert Einstein
- wayno
- Posts: 5320
- Joined: Thu Jun 27, 2013 8:44 pm
- Location: Vancouver WA
- Has thanked: 432 times
- Been thanked: 1302 times
Re: Around Waynos house
I went to a new hobby place yesterday and today, yesterday I bought 3 more two foot flex track pieces and finished the extra(for fun) center area, while I was there I looked at other things also like the power unit/controller that controls the speed and direction the train moves, they had a newer type unit(lightly different) that was ten dollars more than the one I had ordered and paid for already, today I called the other hobby place and inquired about the part(asked if they knew when it was going to ship), I told them I could buy another one somewhere else and the guy suggested I go ahead and buy that one and he would cancel the order there they had placed for me since it had not shipped, so I bought that power unit today.
When I got home after going to Lowes for drawer sliders I added another drawer for the new power unit, it has one switch assembly also I can push one of two buttons to move a track split/diverter, meaning I can move the train to a different track path, the two "Ys" that control the for fun center area can be controlled by that switch, the rest will need to be controlled by another switch/track controller, it would be nice to have all that on that circuit, but until I get another Marklin 7272 control box I will use one of the other ones, I do not think any of the circuits care where the power comes from to control them.
Last night one of the train cars fell and lost one of its axles, they are very small and it took me a couple hours to find it as I had no idea where it came off, I swept the whole area with a broom and did not find it, I was using a magnet to try and find it since my sight is not what it was 30 years ago, I finally looked under the couch and when the light hit it I could see it, it was under the edge of my telescope mirror box where the broom could not get to it, or the broom pushed it there when I swept that spot, I was so happy to find it as I would have thought about it in bed all night if I had not found it, Z scale parts are hard to find, no one has been able to sell me those springs I am missing.
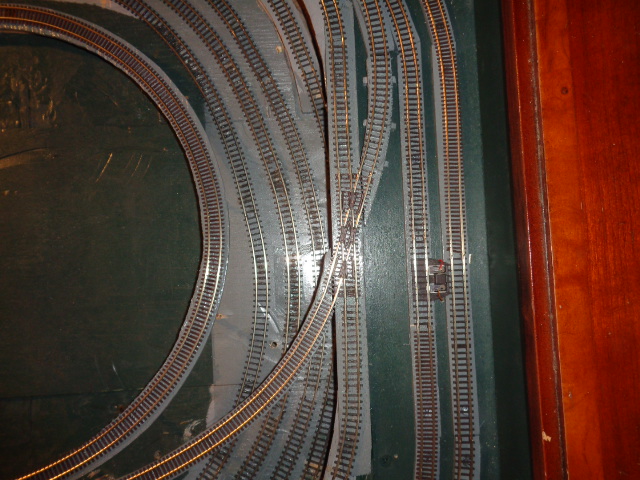
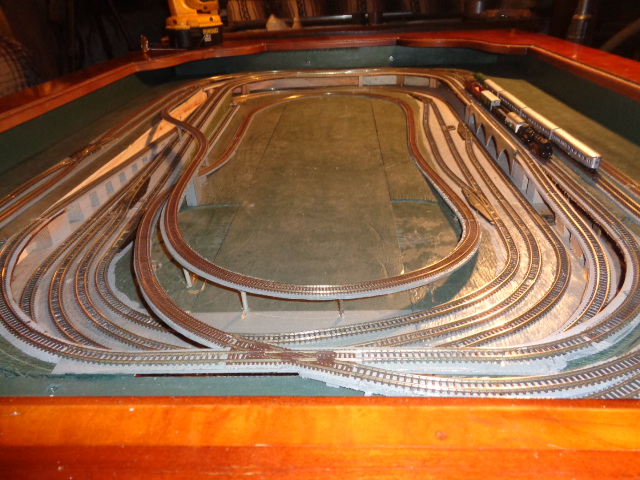
Here in the photo below you can see the gray strip and the wood colored strip without track, this is what I used the new flex track for, it is in the middle area of the original section I made back in 2005, it crosses over all the other pre existing tracks.
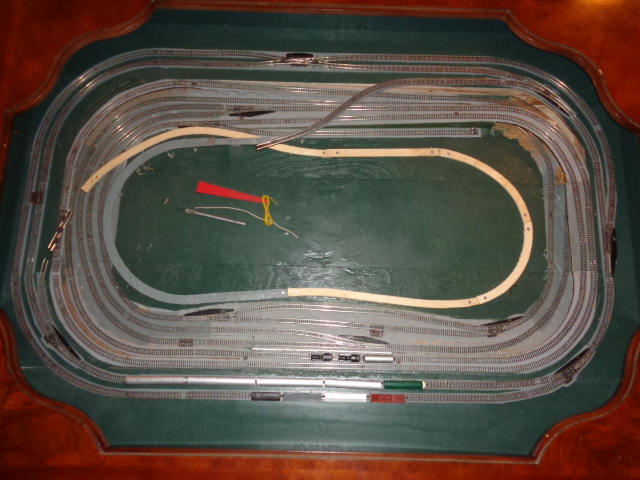
Here it is as it is now, the strips were painted and the track is installed, it works but takes finesse to get train thru that circuit area without a derailment, I tried running the train both ways and it cannot get up the hill if I run it backwards rom the way I designed it, I designed it to go counter clockwise, it just spins out trying to go up the hill.
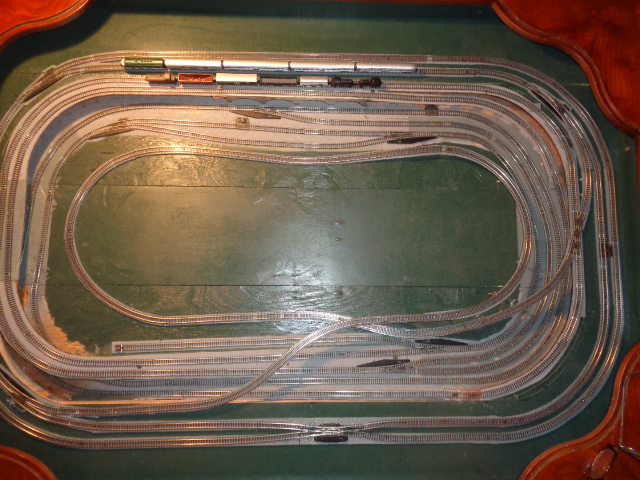
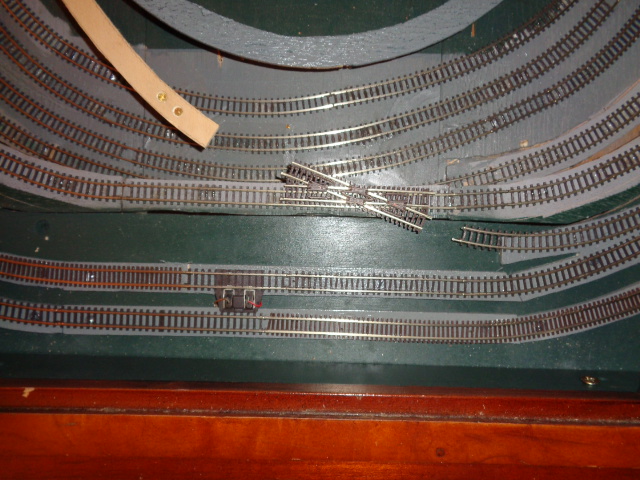
This "X" is the issue when I go the direction designed, the train locomotive hits it moving pretty fast as it is a dead spot when going slow, when the locomotive passes the "X" and it goes into the left curve it pulls on the first long passenger car and it derails on the "X", so right after the locomotive hits the center of the "X" I back off the throttle and the next passenger car smoothly follows the locomotive, the rest follow because when them long passenger cars hit the curve that is so much passenger car in back of the axle that the next car behind it thinks it is still going straightforward, so the 3 other long passenger cars do not get pulled sideways off the track, below it the "X" I am talking about in the center of the photos.
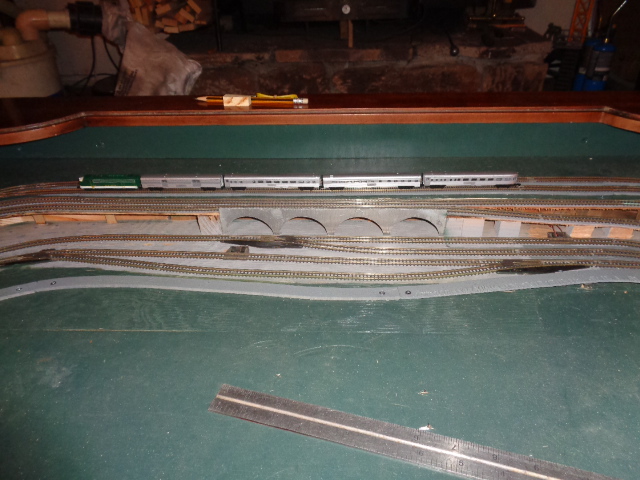
Here is the diesel locomotive with the long passenger cars.
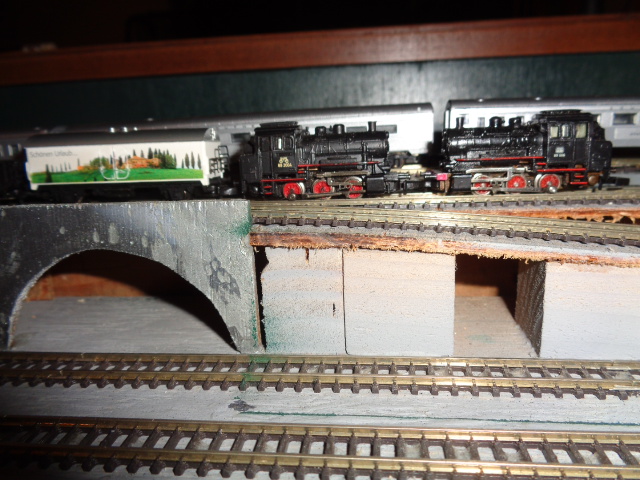
Here is the two small locomotives with the front one backwards, I need to find a couple springs so I can run it forwards when I am using the two together.
Some random photos.
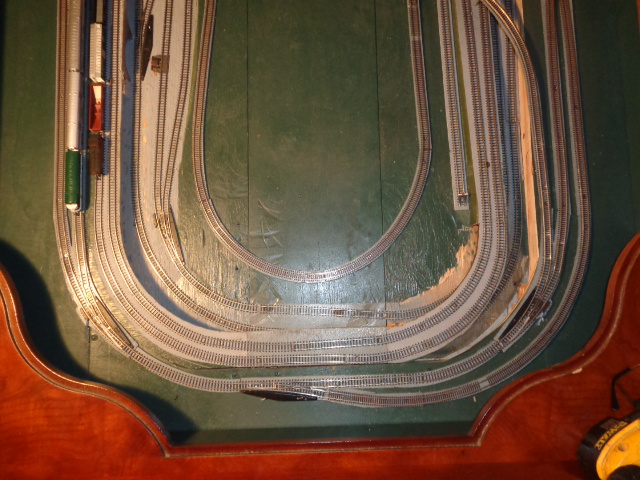
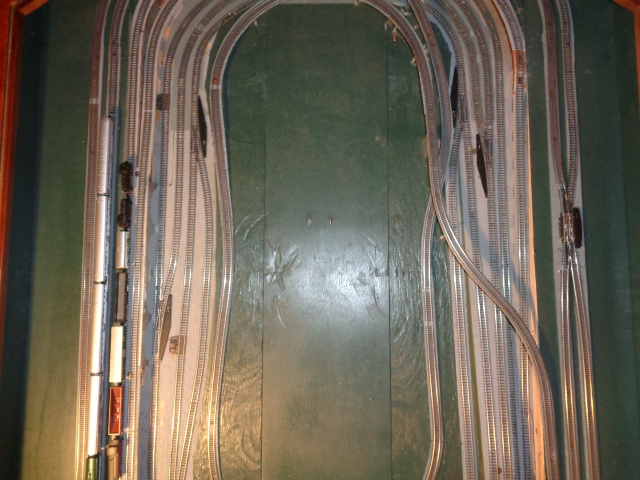
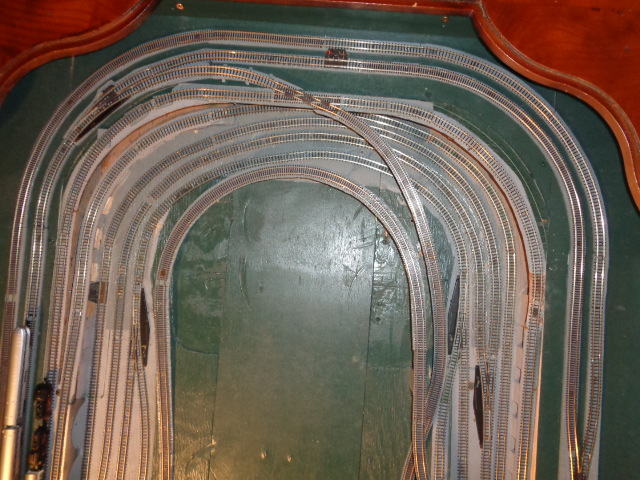
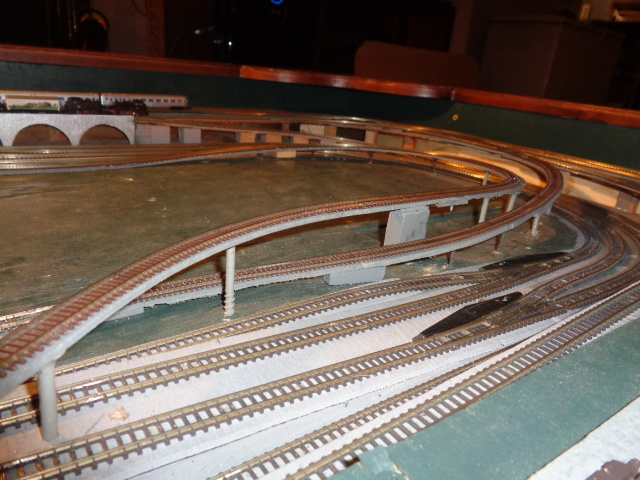
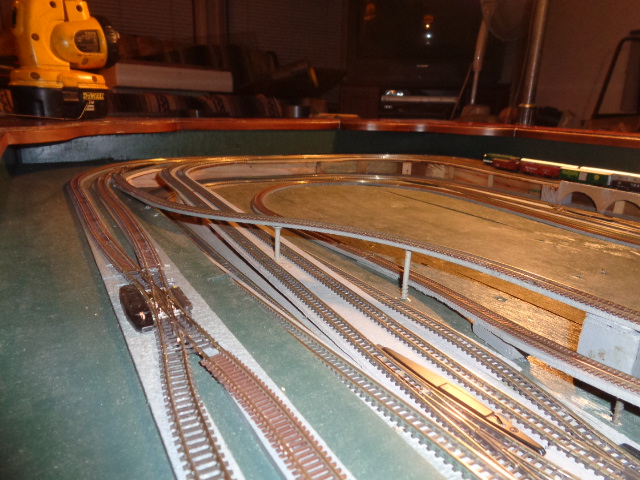
I still have a lot to do including wiring the new switches that divert the trains to different areas/loops, and I also need to put the new additions on the new power controller.
When I got home after going to Lowes for drawer sliders I added another drawer for the new power unit, it has one switch assembly also I can push one of two buttons to move a track split/diverter, meaning I can move the train to a different track path, the two "Ys" that control the for fun center area can be controlled by that switch, the rest will need to be controlled by another switch/track controller, it would be nice to have all that on that circuit, but until I get another Marklin 7272 control box I will use one of the other ones, I do not think any of the circuits care where the power comes from to control them.
Last night one of the train cars fell and lost one of its axles, they are very small and it took me a couple hours to find it as I had no idea where it came off, I swept the whole area with a broom and did not find it, I was using a magnet to try and find it since my sight is not what it was 30 years ago, I finally looked under the couch and when the light hit it I could see it, it was under the edge of my telescope mirror box where the broom could not get to it, or the broom pushed it there when I swept that spot, I was so happy to find it as I would have thought about it in bed all night if I had not found it, Z scale parts are hard to find, no one has been able to sell me those springs I am missing.
Here in the photo below you can see the gray strip and the wood colored strip without track, this is what I used the new flex track for, it is in the middle area of the original section I made back in 2005, it crosses over all the other pre existing tracks.

Here it is as it is now, the strips were painted and the track is installed, it works but takes finesse to get train thru that circuit area without a derailment, I tried running the train both ways and it cannot get up the hill if I run it backwards rom the way I designed it, I designed it to go counter clockwise, it just spins out trying to go up the hill.

This "X" is the issue when I go the direction designed, the train locomotive hits it moving pretty fast as it is a dead spot when going slow, when the locomotive passes the "X" and it goes into the left curve it pulls on the first long passenger car and it derails on the "X", so right after the locomotive hits the center of the "X" I back off the throttle and the next passenger car smoothly follows the locomotive, the rest follow because when them long passenger cars hit the curve that is so much passenger car in back of the axle that the next car behind it thinks it is still going straightforward, so the 3 other long passenger cars do not get pulled sideways off the track, below it the "X" I am talking about in the center of the photos.


Here is the diesel locomotive with the long passenger cars.

Here is the two small locomotives with the front one backwards, I need to find a couple springs so I can run it forwards when I am using the two together.

Some random photos.


I still have a lot to do including wiring the new switches that divert the trains to different areas/loops, and I also need to put the new additions on the new power controller.
“The difference between genius and stupidly is that genius has its limits” Albert Einstein
- DRIVEN
- Posts: 7699
- Joined: Thu Jun 27, 2013 7:05 pm
- Location: I've been everywhere
- Has thanked: 1210 times
- Been thanked: 1180 times
Re: Around Waynos house
Really cool
You and the previous builder obviously spent a lot of energy on that.
You and the previous builder obviously spent a lot of energy on that.
When the only tool you have is a hammer every problem starts to look like a hippy.
- wayno
- Posts: 5320
- Joined: Thu Jun 27, 2013 8:44 pm
- Location: Vancouver WA
- Has thanked: 432 times
- Been thanked: 1302 times
Re: Around Waynos house
I am the previous builder.
“The difference between genius and stupidly is that genius has its limits” Albert Einstein
- DRIVEN
- Posts: 7699
- Joined: Thu Jun 27, 2013 7:05 pm
- Location: I've been everywhere
- Has thanked: 1210 times
- Been thanked: 1180 times
Re: Around Waynos house
Ahhh, I went back and re-read the first post. I remembered that you inherited it but missed that you originally built it. Carry on.
When the only tool you have is a hammer every problem starts to look like a hippy.
- wayno
- Posts: 5320
- Joined: Thu Jun 27, 2013 8:44 pm
- Location: Vancouver WA
- Has thanked: 432 times
- Been thanked: 1302 times
Re: Around Waynos house
You know I read this post again and realized that it is Z scale, but I now wish it had been N scale, all hobby shops have lots of N scale parts/accessories, Z scale is hard to find, there are only 2 hobby shops in the Portland/Vancouver area that carry Z scale, I bought a new speed controller yesterday, it is coming from Canada, they also are going to send me a switch control box when they get the next batch in, I have been looking for both for a while now.
“The difference between genius and stupidly is that genius has its limits” Albert Einstein
- Taterhead
- Posts: 2493
- Joined: Thu Jul 11, 2013 4:18 am
- Cars: '71 510 - Mine
'72 510 - Sons - Location: Central Alabama
- Has thanked: 1354 times
- Been thanked: 236 times
Re: Around Waynos house
Winter time projects. I’ve always thought train setups were cool but I don’t think I’ll ever have the patience to build one. Around Christmas time here every year they set up a very large (probably close to 1000 foot of track) diorama at the children’s museum (McWane Science Center) in Birmingham for kids to ooh and ahh over that I’ve taken my son to many times, although he’s 16 now and doesn’t want to anymore. He always ended up being done looking at it before me.
If you’d like I can stop by the local hobby store and see if they have any Z scale stuff for you
If you’d like I can stop by the local hobby store and see if they have any Z scale stuff for you
- wayno
- Posts: 5320
- Joined: Thu Jun 27, 2013 8:44 pm
- Location: Vancouver WA
- Has thanked: 432 times
- Been thanked: 1302 times
Re: Around Waynos house
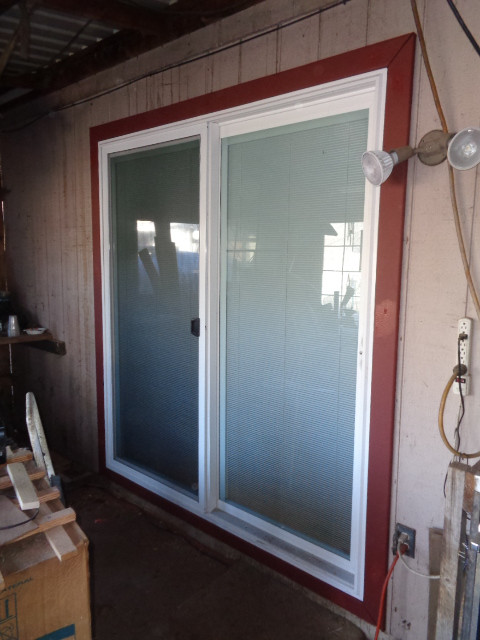
I have too many winter projects going right now, all were mostly caused by the very cold weather we had a few weeks ago, my sliding glass door I installed was because the one I had in there was used(given to me by customer), it was way better than the one I had, but it was wider than the hole I had, I made it work, but the seal between the door and the other section did not seal, so when it was windy 14 degree air blew into the house, I rigged up a seal that worked alright, but I decided to put a proper sliding glass door in when it warmed up, and to do it/install it right also.Taterhead wrote: ↑Fri Feb 02, 2024 10:27 am Winter time projects. I’ve always thought train setups were cool but I don’t think I’ll ever have the patience to build one. Around Christmas time here every year they set up a very large (probably close to 1000 foot of track) diorama at the children’s museum (McWane Science Center) in Birmingham for kids to ooh and ahh over that I’ve taken my son to many times, although he’s 16 now and doesn’t want to anymore. He always ended up being done looking at it before me.
If you’d like I can stop by the local hobby store and see if they have any Z scale stuff for you
As for making a trip to your hobby store to see if they have any Z scale locomotives, I will keep that in mind, but I am not there yet.
“The difference between genius and stupidly is that genius has its limits” Albert Einstein
- wayno
- Posts: 5320
- Joined: Thu Jun 27, 2013 8:44 pm
- Location: Vancouver WA
- Has thanked: 432 times
- Been thanked: 1302 times
Re: Around Waynos house
I finally got my telescope aluminum parts back, I told the guy I was not in a hurry which maybe was a mistake, but everything looks good so far, his welding looks great.
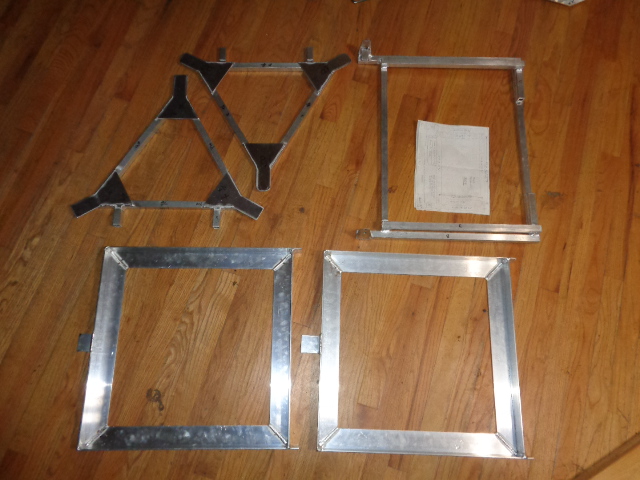
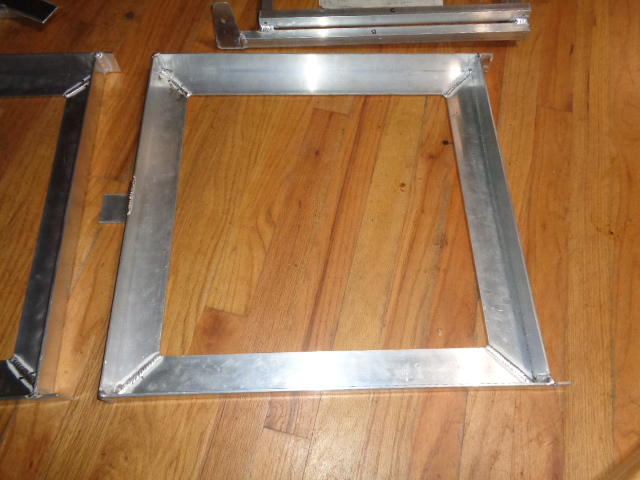
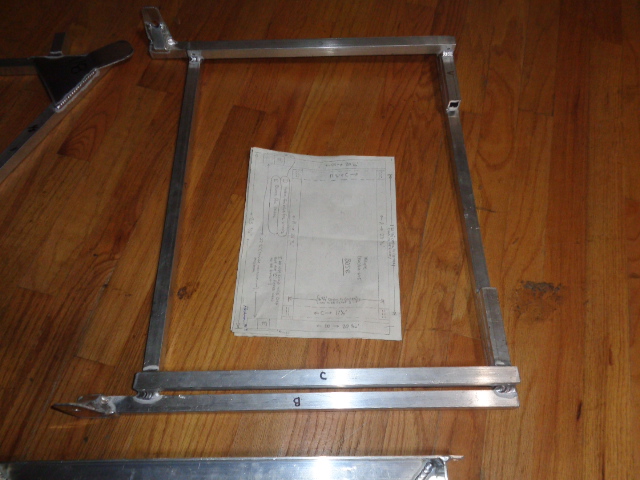
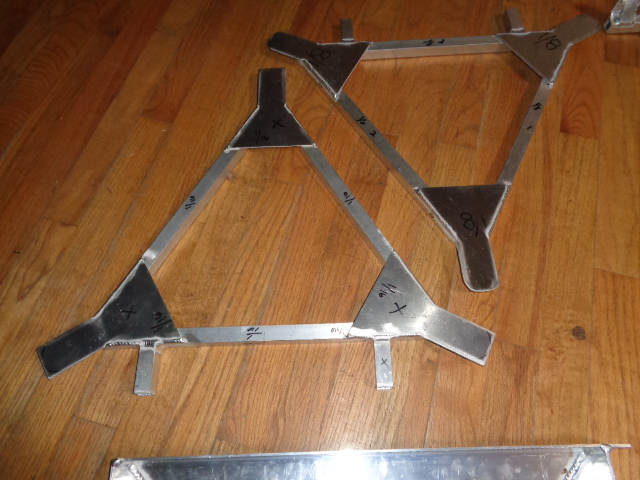
I did some measuring and made a jig(actually two jigs) to find a way to center the mirror cell in the mirror cell base, this might not make sense to someone not involved, but centering a triangle inside a square when the triangle is as large as the square is not as easy as it sounds.
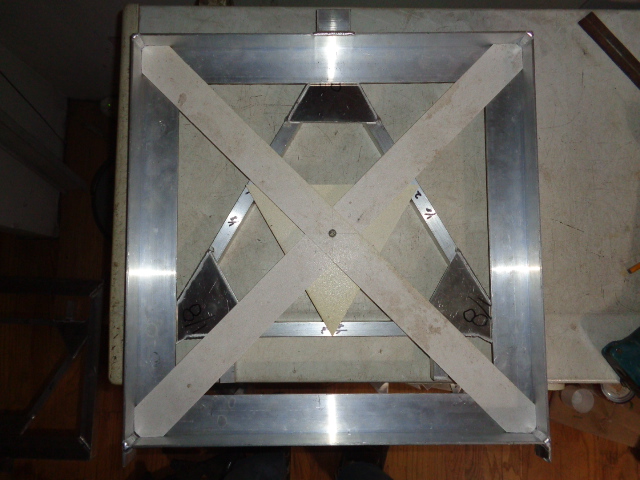
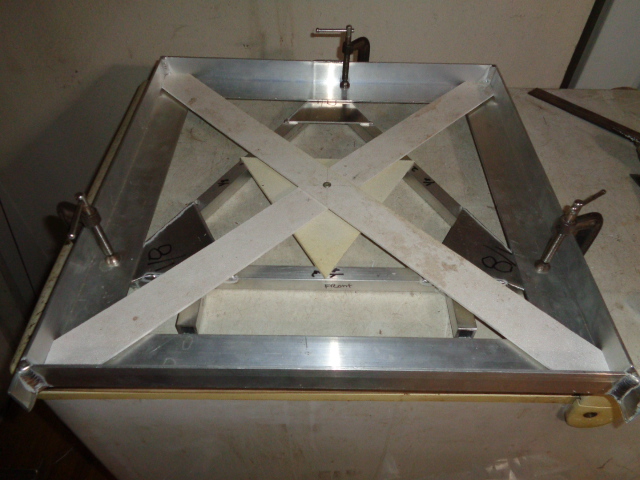
I do it this way so I can drill the 3 holes that mounts the triangle too the square exactly right, then when I put the 3 springs between them, it will settle properly without any change in the mirror cells position(any direction) when being collimated, I cannot have that cell/the mirror moving sideways any direction.


I did some measuring and made a jig(actually two jigs) to find a way to center the mirror cell in the mirror cell base, this might not make sense to someone not involved, but centering a triangle inside a square when the triangle is as large as the square is not as easy as it sounds.


I do it this way so I can drill the 3 holes that mounts the triangle too the square exactly right, then when I put the 3 springs between them, it will settle properly without any change in the mirror cells position(any direction) when being collimated, I cannot have that cell/the mirror moving sideways any direction.
“The difference between genius and stupidly is that genius has its limits” Albert Einstein
- wayno
- Posts: 5320
- Joined: Thu Jun 27, 2013 8:44 pm
- Location: Vancouver WA
- Has thanked: 432 times
- Been thanked: 1302 times
Re: Around Waynos house
I have made headway on the telescope parts.
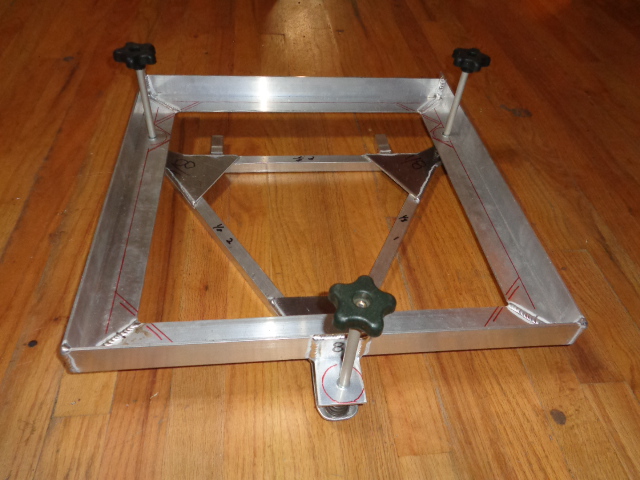
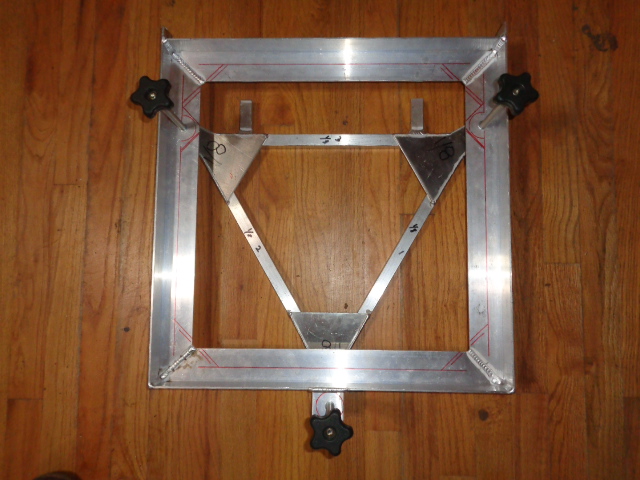
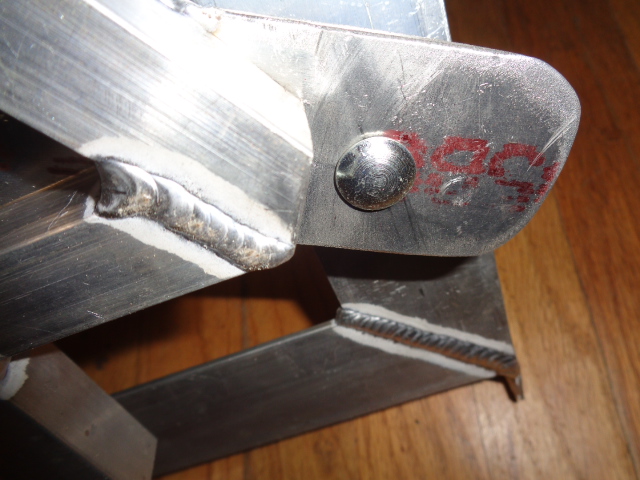
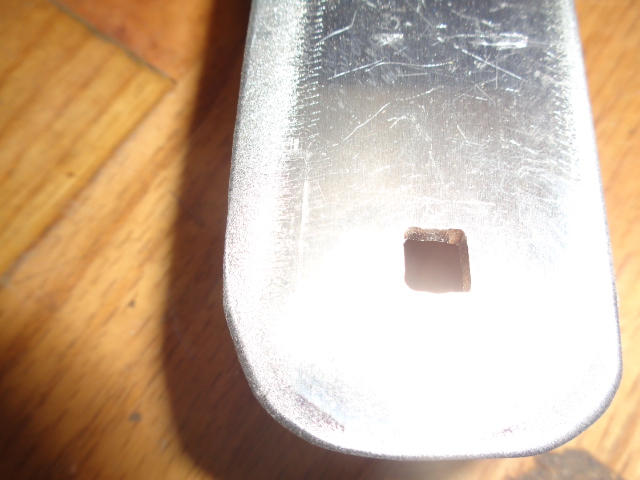
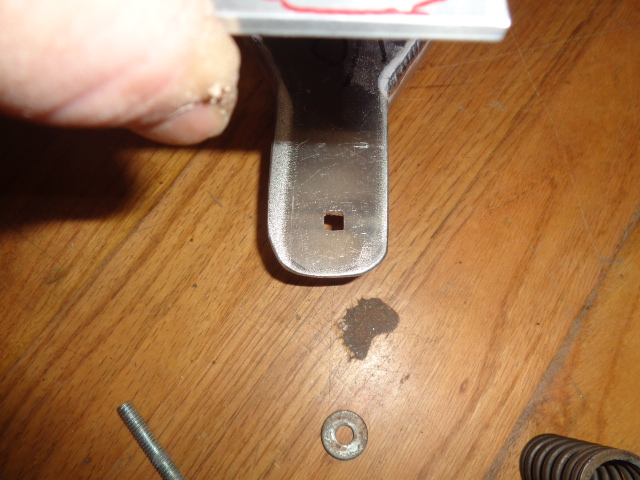
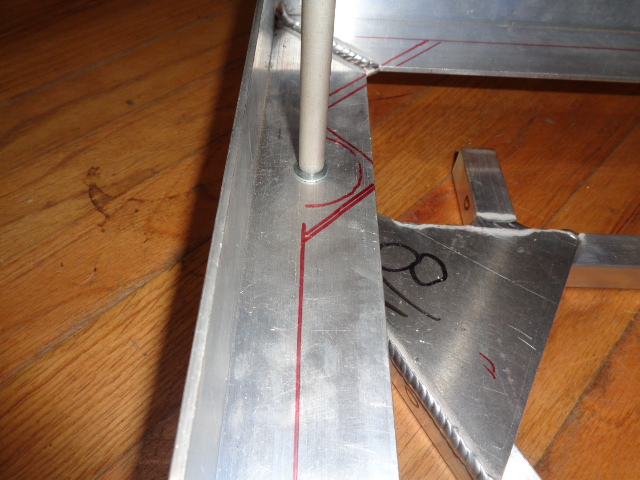
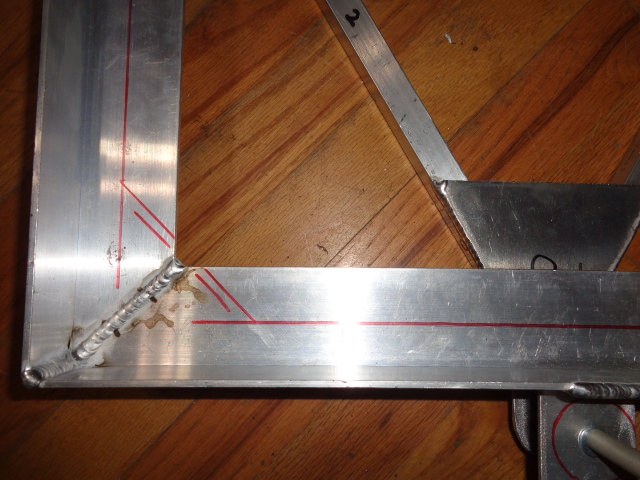
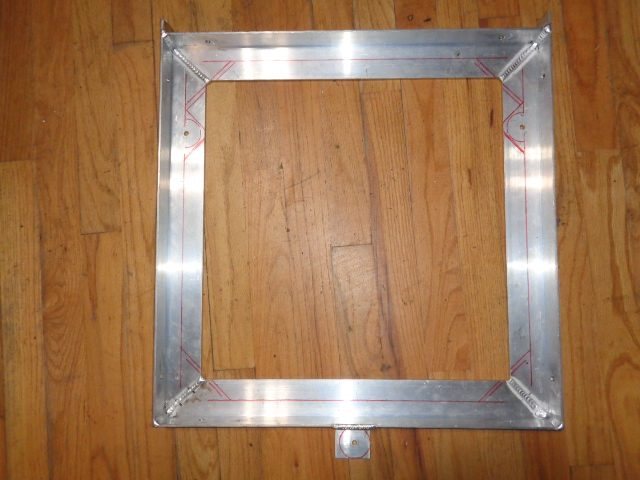
You can see red felt pen markings on the mirror cell base in the photos above, everything inside(towards the center) is going to be cut out to clearance the Primary mirror, and to make it lighter.
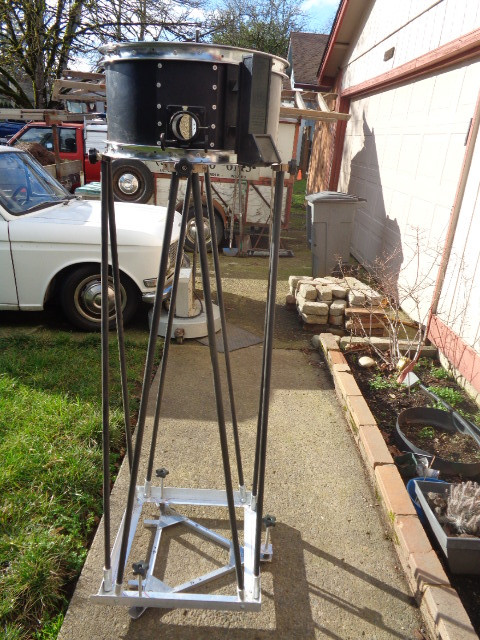
Below are 4 photos of the mirror cell(bare) connected to the mirror cell base, and all the truss poles installed with a complete UTA(upper tube assembly) installed, it weighed 23 pounds.
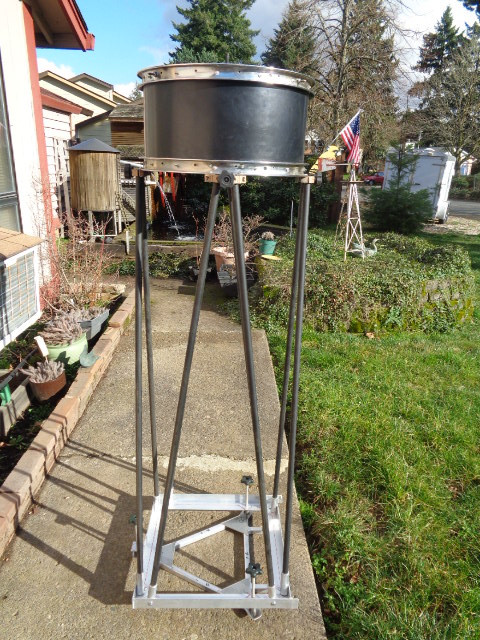
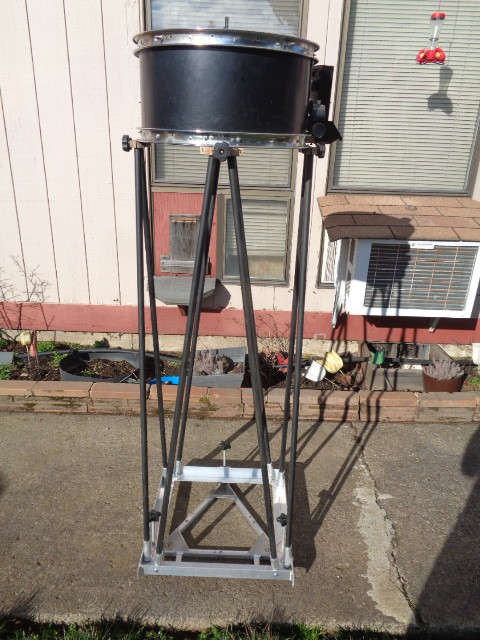
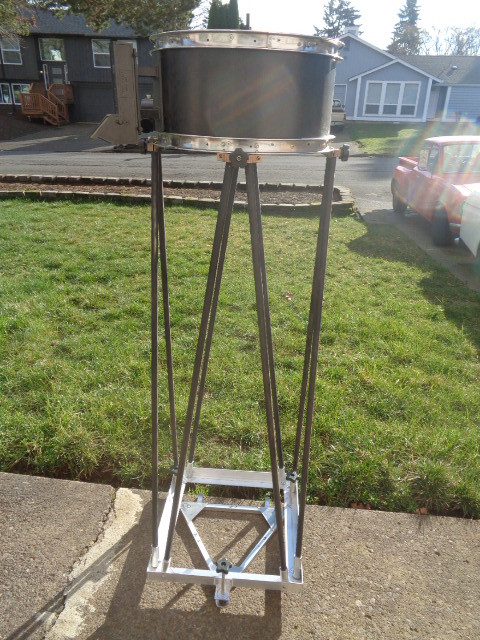
And here are 2 photos of the mirror cell base, before I cut out any metal, and then put together with the metal cut out, it weighed 23 pounds before, it now weighs 21 pounds, but that is on a bathroom scale, I do not really know how accurate it is, I weigh myself, then I pick it up and weigh myself again, it appears I cut out 2 pounds of aluminum, there are metal chips all over the garage now.
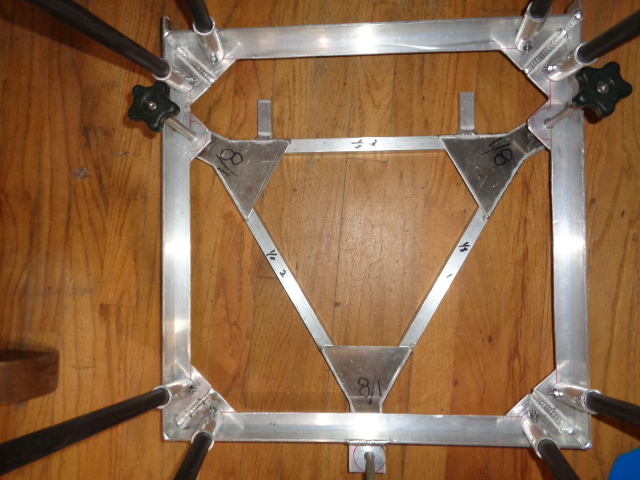


You can see red felt pen markings on the mirror cell base in the photos above, everything inside(towards the center) is going to be cut out to clearance the Primary mirror, and to make it lighter.
Below are 4 photos of the mirror cell(bare) connected to the mirror cell base, and all the truss poles installed with a complete UTA(upper tube assembly) installed, it weighed 23 pounds.


And here are 2 photos of the mirror cell base, before I cut out any metal, and then put together with the metal cut out, it weighed 23 pounds before, it now weighs 21 pounds, but that is on a bathroom scale, I do not really know how accurate it is, I weigh myself, then I pick it up and weigh myself again, it appears I cut out 2 pounds of aluminum, there are metal chips all over the garage now.


“The difference between genius and stupidly is that genius has its limits” Albert Einstein
- wayno
- Posts: 5320
- Joined: Thu Jun 27, 2013 8:44 pm
- Location: Vancouver WA
- Has thanked: 432 times
- Been thanked: 1302 times
Re: Around Waynos house
I have made more progress on this dob structure, I did a lot of everything, mostly I worked on the base this time, I installed the side bearing pads on the base that the side bearings rest in, the pads were made a several months ago, so all I needed to do was remove some material and install them so they swiveled freely, then I test fit them with the functioning dob side bearing structure from the functioning dob that is made of steel, it is a lot heavier than what I am building, but it is light compared to 95 percent of the dobs being used out there right now on this planet.
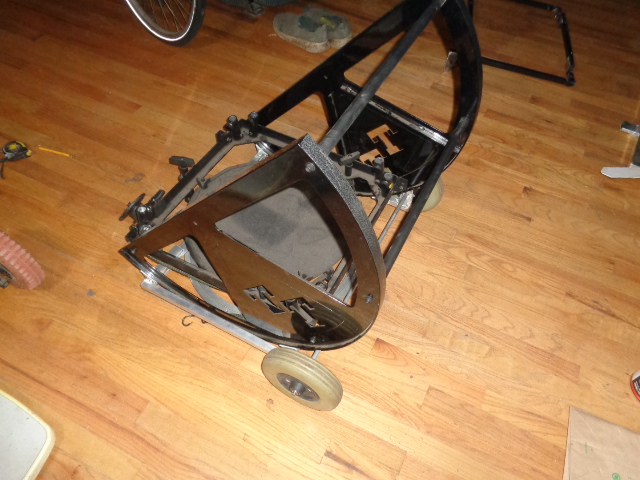
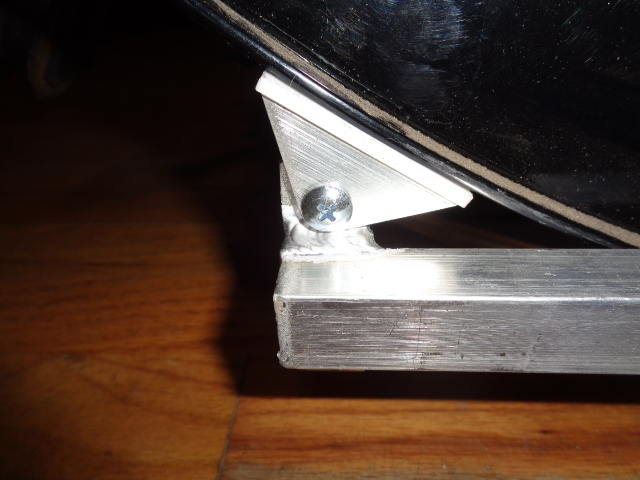
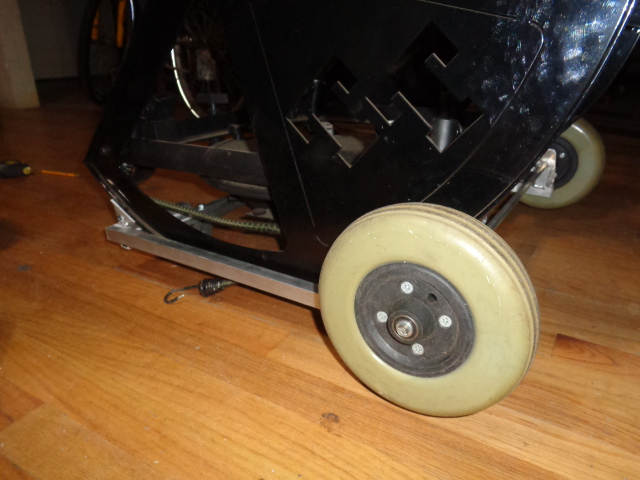
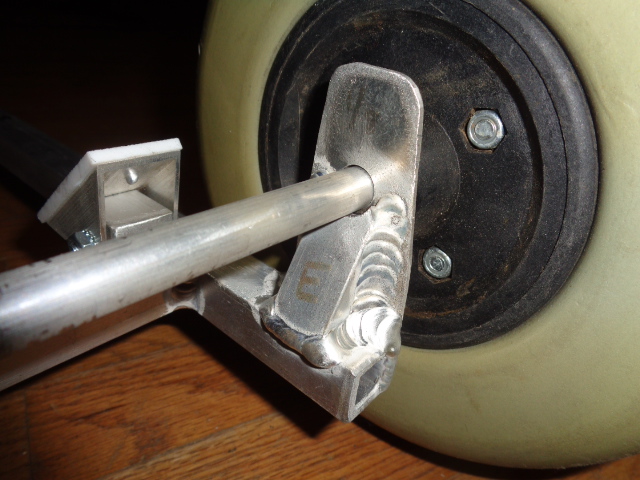
Here is the wheel setup, I used wheelchair wheels this time to save weight.
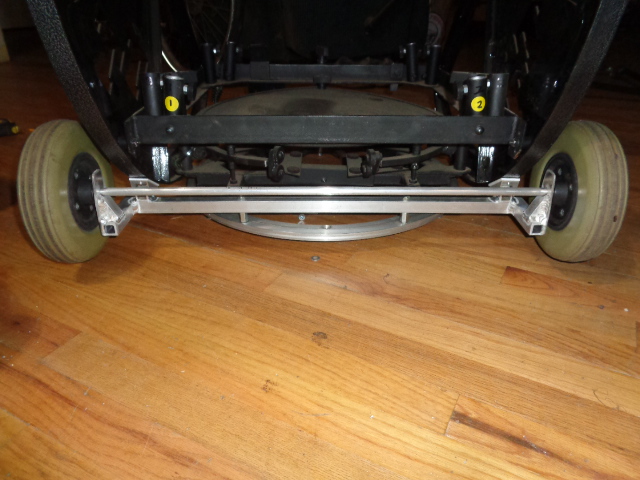
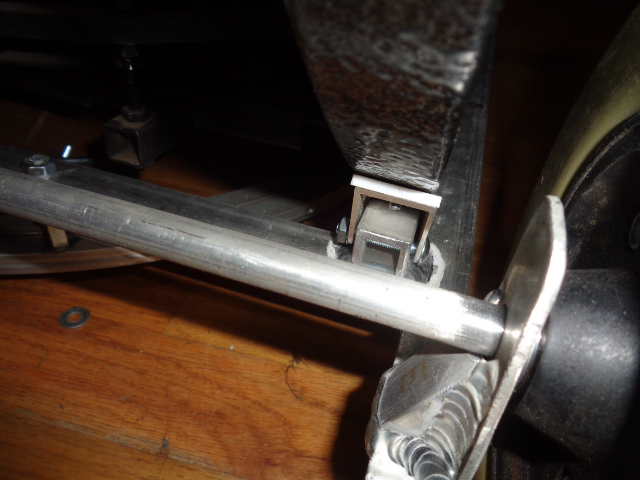
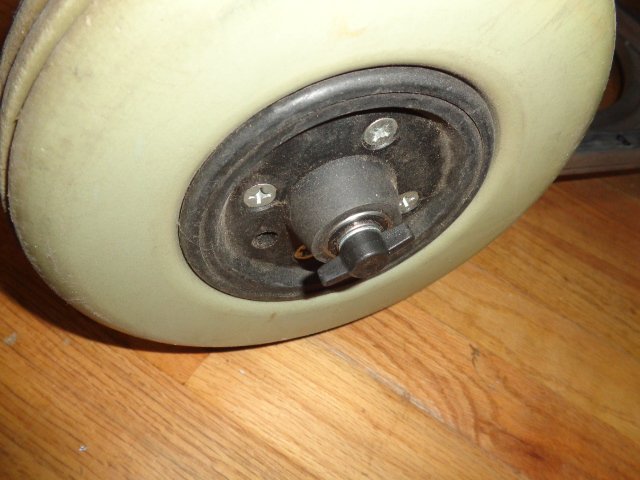
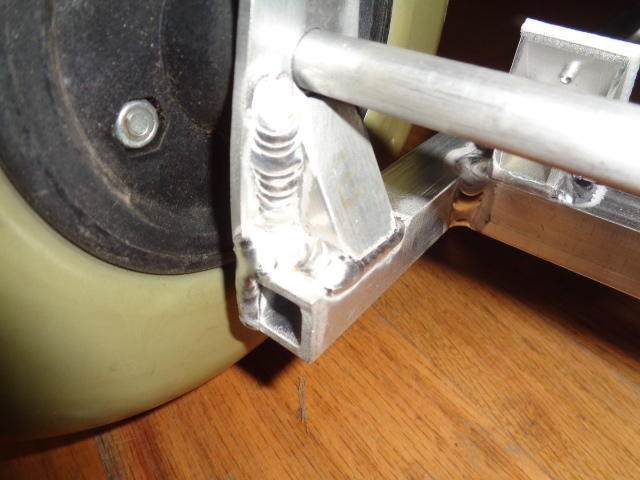
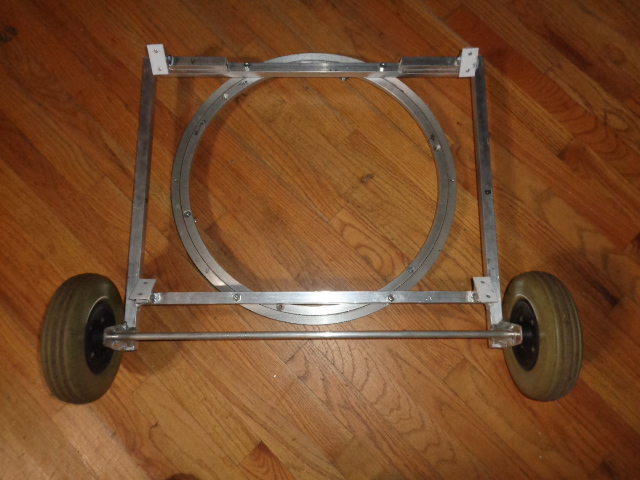
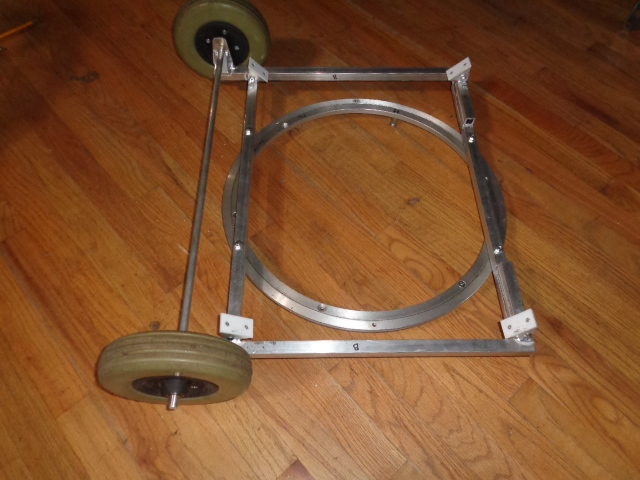
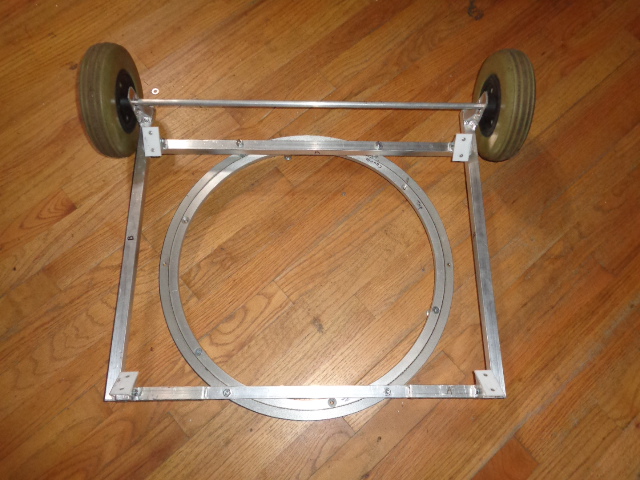
This below is the base, everything in the photos weighs 10 pounds, so the OTA almost complete weighs 21 pounds, and this weighs 10 pounds, add another 3 pounds for the mirror cell hardware that holds the primary mirror, and another 14 pounds for the primary mirror and one has 48 pounds, I will add another 2 pounds for small stuff and I am way under what I thought it would be, I thought it would be 55 pounds at best, likely more.
I needed to use my drill press to drill 3 holes in my mirror cell to hold the primary mirror supports in place but my table was too big, I do not like using a hand drill for this as I am not even close to accurate drilling that way, when out in the garage last night I looked under the table and seen it was removable, I was going to buy a small drill press today but I made a very small table that used a piece of wood for the base, it worked great after I used shims to straighten out my crooked weld job, here is the stock table on a chair.
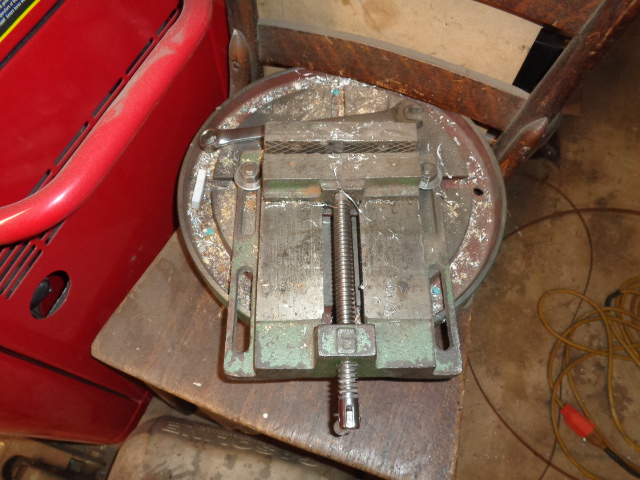
And here is the small table I made with the triangle that needs drilled in position, it worked alright, not perfect, but alright.
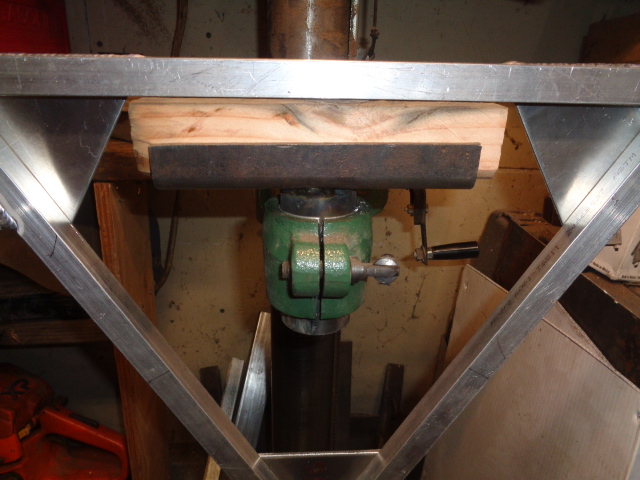
I say alright because the mirror cell is made of 3 separate components, the triangle, the 3 teeter totters, and the triangular support triangles with the support pads on them, the mirror cell is held in position with 3 bolts and springs that are adjustable, the teeter totters rock back and forth freely, and the triangular support triangle with the pads that are held on by one screw in the middle, the latter two of these components self level so no one pad has any more pressure on it than any other pad which would stress the mirror and cause issues with what you are looking at thru the eyepiece(mostly spikes), so one does not have to have perfect connections, but they have to be free enough to self-adjust, every pads supporting the mirror needs to have the same amount of weight in it, I have 18 pads, so 14 pounds divided by 18 means each pad has .777777778 pounds on each pad, that is not much weight on each pad, and when one tilts the telescope down towards the horizon each pad has even less weight on it and that weight get transferred to the wiffle trees, it is just a juggling act.


Here is the wheel setup, I used wheelchair wheels this time to save weight.


This below is the base, everything in the photos weighs 10 pounds, so the OTA almost complete weighs 21 pounds, and this weighs 10 pounds, add another 3 pounds for the mirror cell hardware that holds the primary mirror, and another 14 pounds for the primary mirror and one has 48 pounds, I will add another 2 pounds for small stuff and I am way under what I thought it would be, I thought it would be 55 pounds at best, likely more.


I needed to use my drill press to drill 3 holes in my mirror cell to hold the primary mirror supports in place but my table was too big, I do not like using a hand drill for this as I am not even close to accurate drilling that way, when out in the garage last night I looked under the table and seen it was removable, I was going to buy a small drill press today but I made a very small table that used a piece of wood for the base, it worked great after I used shims to straighten out my crooked weld job, here is the stock table on a chair.

And here is the small table I made with the triangle that needs drilled in position, it worked alright, not perfect, but alright.

I say alright because the mirror cell is made of 3 separate components, the triangle, the 3 teeter totters, and the triangular support triangles with the support pads on them, the mirror cell is held in position with 3 bolts and springs that are adjustable, the teeter totters rock back and forth freely, and the triangular support triangle with the pads that are held on by one screw in the middle, the latter two of these components self level so no one pad has any more pressure on it than any other pad which would stress the mirror and cause issues with what you are looking at thru the eyepiece(mostly spikes), so one does not have to have perfect connections, but they have to be free enough to self-adjust, every pads supporting the mirror needs to have the same amount of weight in it, I have 18 pads, so 14 pounds divided by 18 means each pad has .777777778 pounds on each pad, that is not much weight on each pad, and when one tilts the telescope down towards the horizon each pad has even less weight on it and that weight get transferred to the wiffle trees, it is just a juggling act.
“The difference between genius and stupidly is that genius has its limits” Albert Einstein
- wayno
- Posts: 5320
- Joined: Thu Jun 27, 2013 8:44 pm
- Location: Vancouver WA
- Has thanked: 432 times
- Been thanked: 1302 times
Re: Around Waynos house
I bought all these [avers(8" X 16"), 3 days ago I started installing them, near my patio I had to dig out dirt to make it level with the patio cement throwing it towards the garden railroad ties, working my way out towards the garden I had to dig less and less, about have way I started using the dirt from near the patio to build it up near the garden, it took 3 days to install around 300 pavers, , I had about 550 when I started, I believe I will have enough pavers to get from my shed to the end of my patio towards the west enclosure, I will need more pavers to finish, I put down 5 red pavers and then one gray paver, they are jogged one and a half pavers, every 4th row the gray pavers line up, I had around 70 grays pavers when I started.
I will also need to cut pavers on both ends, near the shed and at the end of the patio enclosure, when I get more I will remove the cut ones and continue towards the fence, IO have a couple photos but forgot to download them onto the computer, I will likely post them tomorrow.
I am getting too old to be doing this shit!
“The difference between genius and stupidly is that genius has its limits” Albert Einstein